Workshop Guide to Percussive Maintenance
(words and photos from VJMC editor, Steve Cooper)
Hammers and bikes normally end in tears; but sometimes percussive maintenance can be a valuable ally in maintenance and repair work for your classic bike.
Sharp shocks and decisive impacts from substantial masses can very often shift, loosen, undo or dislodge motorcycle fixtures and fittings that might otherwise prove reluctant to move. In many cases, applying leverage to a recalcitrant device via a pry bar or an old screw driver can actually impart significantly more damage than a strategically delivered crack from a hammer. If the amount of force used is proportional to both the fitting and the degree of grip or seizure, there’s a better chance that we’ll achieve a successful outcome. Go into the job with the biggest hammer you can find and the result will inevitably be both negative and expensive; but if you're a bit savvy, potentially irretrievable situations can be redressed. Whether it needs a good hard clout or the gentlest of taps there’s a percussive maintenance solution for many a problem.
CROSSHEAD SCREWS
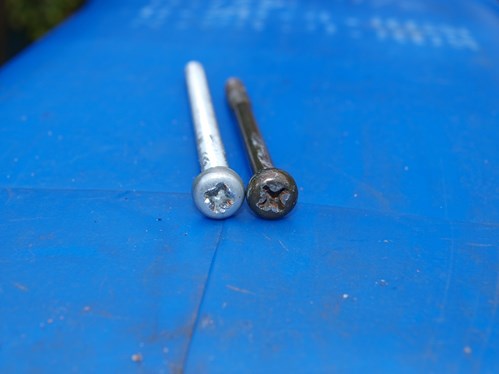
There are good reasons why our friend, the humble hammer, is sometimes euphemistically referred to as “the gentlemen’s persuader”. Our steel and hickory handled bludgeon can often produce some truly amazing turnarounds. For example, you’re about to remove an engine cover with your trusty impact driver, which requires input from a hammer, when you notice that a previous owner has attacked several of the crosshead screws with badly chosen screwdrivers. The result is a set of screw heads with little more than conical holes for purchase. Before you take umbrage and a drill to the offending screw heads, a little percussive maintenance may do the trick. With a suitably sized flat headed punch and a hammer, a few quick clouts can transform quite badly damaged screws into something that is readily removable, but probably not reusable.
SLIDE HAMMERS & ROTORS
Some rotors don’t have an external thread onto which you can screw a puller. Having removed the central bolt, the manuals will either encourage you to “simply remove” the rotor, tell you how to ruin the windings with a 2, 3 or 4 leg puller, or use a draw bolt as per factory manuals. The latter can sometimes work by screwing down tight onto the end of the crank and applying tension to the rotor’s inner face. Alternatively, the process may dumb over the end of the draw bolt or strip the internal threads of the rotor; neither of which gets the restoration much further ahead. My sources tell me that the real way the factories dealt with this challenge was to use a slide hammer. These oddly shaped devices that look nothing like a conventional hammer have the unique ability to apply a targeted axial force or impact to the item in question. Unlike a free-lance hammer which is applied by eye and hand co-ordination the slide hammer delivers a force precisely where it’s needed. A large mass is slid along a metal shaft, away from the item that needs to be dislodged where a purpose made obstruction stops its path. The motive force is then transferred to the metal shaft and the object to which it’s attached. This process is repeated until the rotor drops off the end of the crank. Here my rebuilt restored RD200 engine has sweated the rotor on tight since I last worked on it.
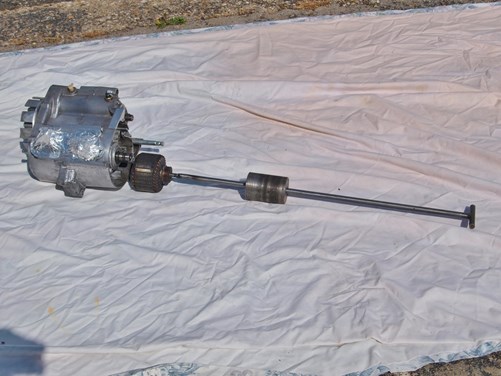
In this case the flying-hammer head is slipped onto the shaft and the threaded portion of the shaft screwed all the way into the rotor. The heavy metal cylinder (aka the hammer) is hurled, thrown or accelerated up the shaft and away from the rotor. Although obvious when read it’s all too easy to forget that you need to keep all bodily parts away from the end of the shaft; believe me you only trap your thumb, finger or skin twixt hammer and stop once. The fit between a rotor and its taper are generally intimate so it’s always best to have the engine in the frame if at all possible. The pictures show the process as used on a free engine and although possible it’s not ideal. Every whack of the hammer has the engine jumping around on the bench or across the workshop floor. In one extreme case I’ve had to lay the bike on the ground, fix the shaft in place then stood on the bike’s frame rails so that I’m not simply wasting the effort imparted by the hammer in moving the bike around the yard but directing the force where it’s needed. This approach gets strange looks from the neighbours, a scornfully embarrassed look from the kids and gaze of blank incredulity from your significant other.
Flywheel pullers
At some time during an engine overhaul you’ll have need to remove a rotor or magneto from a crankshaft and it won’t be possible to use a slide hammer. Workshop manuals warn the owner to use factory tools then give a picture of an anonymous pair of hands applying a very large portion of grief with a 2, 3 or 4 leg puller. There will generally also be same inane caveat that warns such pullers can damage the rotor core and thus negate the possibility of obtaining a service exchange on the dead rotor. Here I’m revisiting our very own Project Chappy.
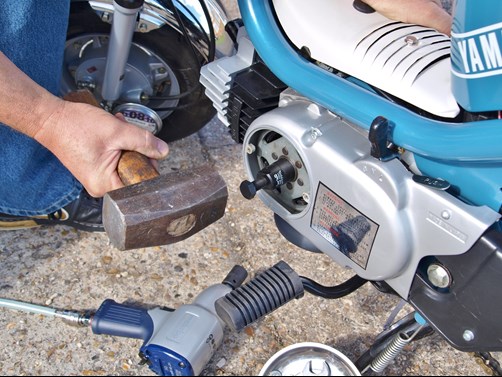
Using a factory tool or a good copy makes life so much easier, but the key to safe removal after winding up the puller and draw bolt is a quick crack with a hammer on the
end of the bolt. Although the idea of hitting a crankshaft with a club hammer is something of an anathema to most of us, this approach generally works when everything else fails. When the rotor finally does come off the taper, be prepared for a loud crack; no, you won’t find half an engine on the end of the puller. When the joint is finally broken the energy must be dispersed and Mother Nature and the laws of physics have kindly decided that you need to be aware of this.
Swinging arm and wheel spindles
Years ago, I had an entire weekend blighted by a late night puncture. Having limped home with a tube crammed with foaming Finnelec (can you still buy it?) I was faced with a rear wheel that needed removing prior to the extrication of a nail and the fitting of a new tube. Simple job, surely? Unfortunately, as is the way of these things, the wheel spindle was happily locked in a romantic tryst with the inner race of both wheel bearings. Despite several bent tommy bars, prayers, penetrating oil, entreaties and some good old-fashioned Anglo-Saxon medical terms, Mr. Spindle and Ms.Bearing refused to break off their ongoing relationship. By removing the silencers and anything else in line of sight of the hammer’s baleful glare, retribution could be taken.
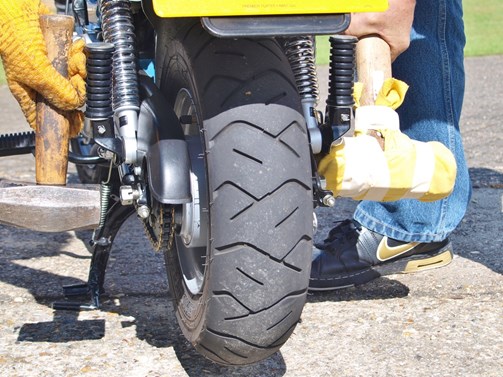
Once again with my restored Chappy in the shot, it gives a more calm and controlled view of the technique; at the age of 19 I was not known for my patience. Removing the wheel spindle nut and replacing it the wrong way around protects the thread and castellations so that the spindle is ready to receive 7 pounds of best club hammer. The key here is to absorb the transmitted shock on the other side of the swinging arm. Placing a heavy mass on the opposite side to the impact allows surprisingly heavy forces to be applied without undue damage to the swinging arm or its bushes. The absorber needs to be at least as heavy the hammer being wielded and ideally significantly heavier; a sledgehammer is ideal. Excellent, two hammers being used in unison! A thick piece of cloth or wood wedged between sledgehammer and frame should negate any significant cosmetic damage. Wheel spindles treated thus normally give up with a whimper and after cleaning and greasing normally refuse to engage further romantic rendezvous with the bearings. The process also works for swinging arm spindles providing you remove any grease nipples and protect the spindle’s threads.
Deadblow mallets
These devices are a perfect example of the appliance of science. When a hammer is used there is generally some bounce-back or reflection of the energy. This is normally experienced as the hammer jumping back off the work piece. Dead blow hammers have a partially hollow head that is loaded with metal shot. The idea is that as the hammer is swung the shot is falls away from the front face but carries on moving forward at the moment of impact. The extra impetus delivers the mallets entire mass with no recoil. Foot rest rubbers can be fitted via a range of techniques but are sometimes just too tight to fit easily. A quick blast up the hole with carb cleaner and a deft blow with from the mallet seats them perfectly with no damage.
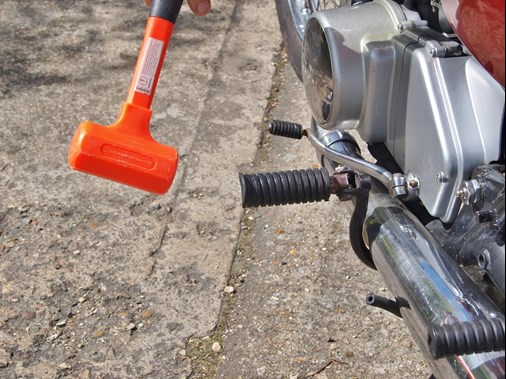
Try doing the same with a club hammer and you’re likely to ricochet the thing straight back into your shin.
Carburettors
A hammer and a carburettor (on paper at least) make unlikely bed fellows but sometimes a little percussive maintenance can do wonders. The fuel valve in the carb works off the float much like a toilet cistern but if dirt gets caught between the needle valve and its seat, fuel is likely to run out of the overflow. Before you start ripping your carburettor apart to clean out the crud it’s often worth giving the carb a strategic tap to see if the dirt can be dislodged.
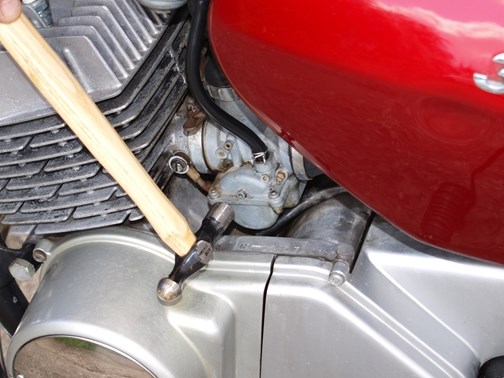
Note we’re using a hammer here of appropriate size and not the first hammer that comes to hand; moderation in all things.
Air guns
Although you can’t actually describe an air gun as a hammer it does actually work on sound percussive principles. When the drive rotates it does so with a series of stutters that impart forceful, repeated hammering or jarring motions to the fixing in question. It’s the scientific and mechanised equivalent of attacking a seized nut with a cold chisel and hammer but it delivers the blows much more effectively, infinitely more accurately and with no perceivable evidence of butchery. If you have an engine out of the frame and forgot to loosen the gearbox sprocket, rotor nut or clutch basket nuts, this approach is flawless and guaranteed to work
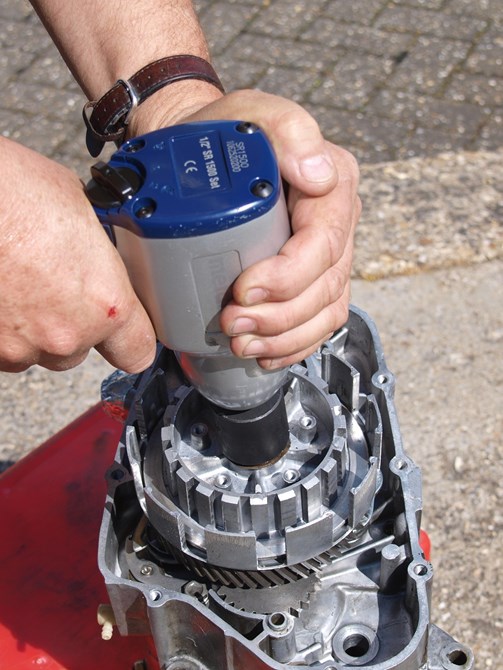
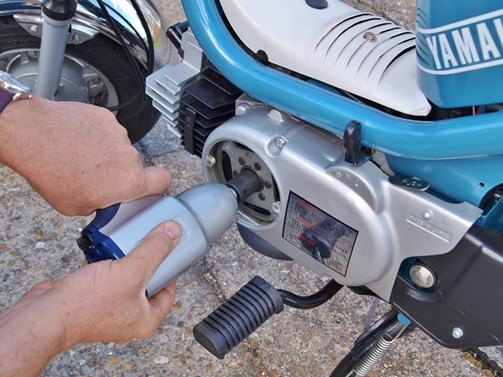
Once you’ve skinned your knuckles on the sprocket or shattered a clutch basket you’ll appreciate just why you need an air gun and compressor.
Fork and yokes
Removing telescopic forks should be fairly straight forward but sometimes they can get stuck or corroded into one or both yokes. Firstly, unwind the top fork nut a few threads but still leave partially screwed in. Then drive a blunt screwdriver into the pinch-slot of the yokes with a few gentle taps from a hammer.
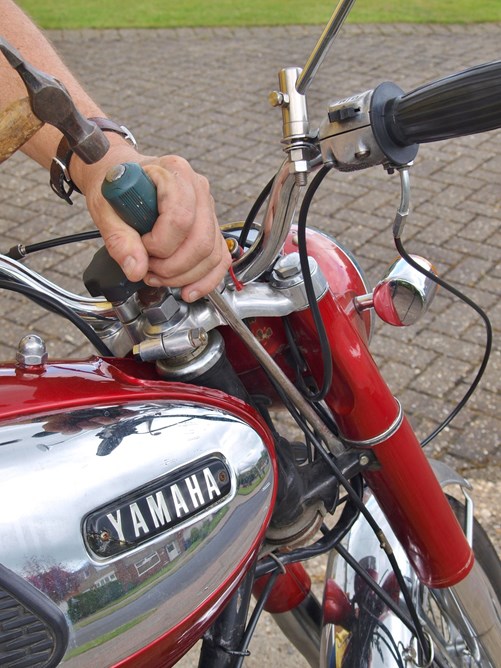
The stanchions are thus freed as the clamp is gently expanded. A couple of well-aimed taps from a dead blow hammer to the fork top nuts and the stanchions are free and ready to be removed.
Conclusion
Percussive maintenance has a very real place in any workshop. Used without any common sense or some planning and damage or chaos is almost inevitable. With a bit of lateral thought and a grasp of whether to tap it or whack it, motorcycle maintenance can be a whole lot easier. Providing the amount of force and the hammer used are proportional to the job in hand there’s a very real likelihood that success is guaranteed. In the wrong hands a hammer is an accident waiting to happen; in the right hands it’s simply another precision tool in our arsenal ready to play its part in maintaining our classic bikes.
For more technical advice, visit Motorcycle Workshop Guides: The Complete List.
To find out more about a classic bike policy from Footman James and to get to an instant quote online, visit our Classic Bike Insurance page.
The information contained in this blog post is based on sources that we believe are reliable and should be understood as general information only. It is not intended to be taken as advice with respect to any specific or individual situation and cannot be relied upon as such.

COMMENT